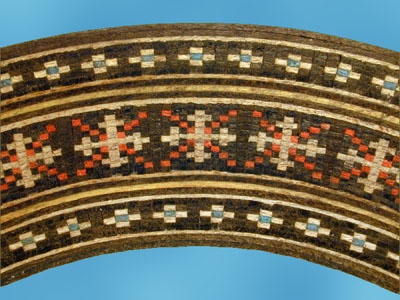
Tuesday, December 20, 2011

'The Itty-Bitty Pieces of Wood' Mash-Up... And Sounding It Out

rosette
What would you call the effect of chopping up pieces of wood, gluing them together, slicing them up again, and gluing them together again (and slicing and gluing again if leisure permits)? Would the timber's tinder have a timbre, a tonal personality? When you pick it up, what sort of music would you play with it? Someone trained in the tradition of building instruments, a luthier would know best. Musicians eventually discover that woodworking and music are historically intertwined- let's say it: "woven"- with one another. I'm interested in how different woods are combined for aesthetic appeal using any iteration of two primary techniques: one is cosmetic, as in wood inlay and marquetry design, and the other is structural, as in combining wedges for the body of a lathe-turned bowl.

Bowl by Jim Sprinkle 
includes copper metal with choice hardwoods 
Both processes incorporate disparate grains and colors of wood toward a single, planar surface. You see it on furniture, small goods, musical instruments, and even on bicycles. As I had attempted to use inlay on my table project this semester, I'll describing inlay and marquetry that appears on musical instruments. 


In the Baroque period (16th century, as in Louis XIV), when rich people could afford music education in their own homes,  music was composed for small ensembles (chamber music) to play in front of a small audience in a small space. Did I mention that the emphasis is on smallness and detail? I would imagine that the same applied to furniture then, when Islamic art had considerable influence on the visual Baroque style.Luthiers would imitate "strapwork" on lutes, any carving or arranging of wood so that it appears to be woven together geometrically. (Winternitz) 


Marquetry refers to the application of a slice of wood to a bigger piece of wood to create an image. It's also called veneering. Where geometry is vastly repeated as on wood floors, the term parquetry is used. Buhl (German) or boulle (French) is the use of brass, shell, or other materials in achieving similar effect. Intarsia is the Italian word for combining woods in reference to the technique of knitting to weave different colors of yarn together. In addition to that, purfling is a technique used purely cosmetically to distinguish joined planes of wood by introducing a thin band of a different color, while "binding" is a band of inlay with used to mechanically close the edges of the instrument so that the end grain is no longer exposed, which means it is protected from cracking in the future. 

Many terms in Western lutherie and music derive from Italian, Germanic or Franco vocabularies as a result of the widespread European mercantile and artistic influence in the 16th and 17th centuries. For instance, archette (bow), rosette (the embellished sound hole)... etc. It is hard to tell when inlay was first used because early uses of wood predate historical documentation in any part of the world. However, due to the volume of French and German scholarly writing on classical stringed instruments, their history is easy to acquire if you can read in those languages. (Try a query for "marquetry," "luthiers," and "instruments" within the King Library collections, and you'll see what I mean.)  

Violins and cellos built by the famous luthier families of Europe, such as Stradivarius, tend to be appraised higher in the string market. It's due in part  ; contemporary instruments of the same quality will not come as close in value. It is due partially to the acclaim of the family, the amount of money they made off of rich 
Historical accounts of professional marquetry occur in rural towns of England, Japan, and Morocco. That's most of our 
hile the lack of copious writing on the craft is attributed to the "folk" nature of building musical instruments- those who were considered experts in the field did not function traditionally as those writers or scholars who published literature.  Trevor Semple and Anne Cole are exemplary luthiers who thoroughly document their processes for plebian curiosity- now, practically everyone with a computer and an internet connection is literally able to share in woodworking techniques, including the itty-bitty-teeny-tiny stuff.

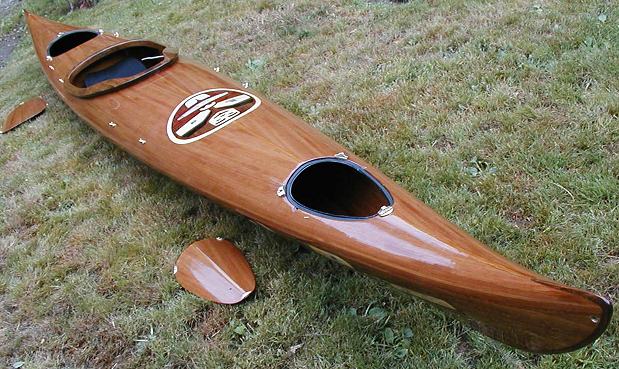
Kayak by Jürgen Köppen,
binding on the ends


References:

Annette Otterstedt, "Investigating Green Marquetry on Bowed-String Instruments. The Leaves Be Greene," The Galpin Society Journal, Vol. 54 (May, 2001), 330-338.

Emanuel Winternitz, "The Evolution of the Baroque Orchestra," The Metropolitan Museum of Art Bulletin, New Series, Vol 12, No. 9 (May 1954), 258-275.

"Luthier,"  Wolfram|Alpha knowledgebase, 2011, http://www.wolframalpha.com/input/?i=luthier

"Marqueterie,"  Wolfram|Alpha knowledgebase, 2011http://www.wolframalpha.com/input/?i=marqueterie 

"Marquetry," Oxford Dictionarieshttp://oxforddictionaries.com/definition/marquetry?q=marquetry (accessed 13 December 2011).

Maximiliaan Ruttern, "The Art Case Piano," The Galpin Society Journal, Vol 58 (May 2005), 168-172, 227-229.

Zachary Taylor, Marquetry & Inlay Handbook, Sterling Publishing Co, 2003.

Friday, December 16, 2011

Alvar Aalto

Alvar Aalto was a well known Finnish architect and desinger, who also worked on textiles and glassware. During his time, Aalto had many clients who were industrialists since his career was parallel with the fast growth of industrialiazation and economic growth in Finland. The span of his careers went from the 1920's to the 1970's and his style of work included Nordic Classicism, International Style Modernism, and Oranic Modernist Style.
Alvar was born on February 13, 1898 in Finland. His father was a surveyor and his mother was a postmistress. In 1916, when he was 18 years old, Aalto enrolled to study architecture at Helsinki University of Tecnonology and graduated in 1921 at the age of 23. After graduating from the university he returns to his hometown in Finland in 1923, where he opens his first architectural office. Aalto was well reknowned for his architecture in his hometown since most of the buildings were built by him. He is known as one of the most influential architects in the style of Nordic modernism. In 1925, Aalto completed his first public building a workers club for his hometown and two defence corp buildings.
Aalto would later shift his designs from classicism to modernism. Aalto completed the Viipuri Library and the Paimio Sanitorium, architecture pieces that caught the world's attention and made him well known. Later Aalto would experiment with woodwork and move awaya from the style of modernism. His first experiment would be building a luxury home for a couple in 1939 which turned out to be a success. His sucess and growing fame led to him being invited as a visiting MIT professor in America. He taught his students about architecture and also helped design one of the dormitory buildings on campus. After teaching at MIT, Aalto returned to Finland rebuilding the school where he was taught about architecture. After his death in 1976, his wife took over his architecture office and created works such as, city theaters and an opera house.
Aalto went through many different styles including Classicism, Modernism, to experimenting with his own unique style. He was involved with many projects like city planning, architecture, furniture, interior design, glassware, and even painting. Majority of his projects/buildings are in Finland but some are spread across the world including the U.S., Germany, Italy, and France. Of Aalto's 500 planned buildings and projects, 300 were built. Some of his experimenting on his style led to to invention of a new form laminated-bent plywood. Another invention by Aalto is his high stool and stool e60 which are used in Apple stores to seat customers.

Julia Weber: Slöjd – an educational approach to wood working

The Goals of Slöjd Education:

To instill a taste for and an appreciation of work in general.
To create a respect for hard, honest, physical labor.
To develop independence and self-reliance.
To provide training in the habits of order, accuracy, cleanliness and neatness.
To train the eye to see accurately and to appreciate the sense of beauty in form.
To develop a sense of touch and to give general dexterity to the hand.
To inculcate the habits of attention, industry, perseverance and patience.
To promote the development of the body's physical powers.
To acquire dexterity in the use of tools.
To execute precise work and to produce useful products.

Otto Salomon, 1900


The Scandinavian Slöjd system was developed and promoted by Otto Salomon (1849-1907). Salomon was intrigued by the idea of making physical work an element of general education. He believed that we learn most effectively by doing things with our hands and developed a system for a craft based training. He put his theory into practice by founding a vocational school for boys in 1872, a vocational school for girls in 1874 and a teacher training school for slöjd teachers in 1875. All of his schools were located in Nääs near Götheburg in Sweden. From 1882 onwards Salomon concentrated his activities on the teacher-training school, lecturing and organizing for the further training of elementary school-teachers. This training scheme was designed so that serving teachers could obtain handicraft teaching skills, in addition to the ability to teach theoretical or academic subjects. In educational slöjd each student was put through a course of making models based on everyday, functional objects, along the way learning basic woodworking techniques and a range of organizational skills.

Slöjd is an old Scandinavian word that comes from the adjective slög that means ‘handy’. Slöjd means ‘craft’ or ‘manual skill’. About 1885, Salomon used the expression pedagogisk slöjd (educational sloyd or craft), defining it in a school and educational context. In his introductory remarks from the Teacher´s Handbook of Slöjd Otto Salomon made clear that, educational slöjd was not to be mistaken with the work of an artisan trade. Slöjd was meant as an educational approach without the economical considerations of a trade. Various materials such as wax, clay, paper, pasteboard, wood or metal could be used in educational slöjd. Wood slöjd and the so called slöjd carpentry has been the most popular of all. While slöjd carpentry and ordinary carpentry used the same raw material (wood) and to some extend the same tools, they differed from each other in many ways. The objects produced in slöjd carpentry were usually smaller in size and bounded by curved outlines. The most characteristic tool in slöjd carpentry was the knife while the carpenter prefered the chisel. The working conditions of the slöjd worker were much more primitive than those of a commercial trade and a division of labor was not allowed.

The goal of educational slöjd “lies in rightly directed bodily labor, as a means of developing in the pupil´s physical and mental powers which will be a sure and evident gain in life” Educational slöjd brings forward “pleasure in bodily labor, and respect for it, habits of independence, order, accuracy, attention and industry, increase of physical strength, development of the power of observation in the eye, and of execution in the hand (Otto Salomon).”

Teaching slöjd was a very methodical educational approach that followed a strict set of rules and guidelines for the teacher as well as the student. Salomon broke down woodworking into a series of very simple steps that could be mastered in turn. First using a tool in a particular way, then doing a simple project, then progressing to slightly more complex methods and projects. The teacher had a guiding role in Slöjd education. While the student was supposed to work independently and accurately, the teacher role was to be as passive and unobtrusive as possible. He should never touch the students work and in his instruction he should give as little explanation as possible to encourage the student to use his own hands and head to discover the right way. Each student was supposed to have his own workbench and his own tools, both should be labeled with numbers. These tools included a knife, trying-plane, jack-plane, square, marking gauge, compasses, rule or metre measure, and scraper. Students were responsible for keeping the tools in an assigned space and in good working condition. During their work the students should avoid talking and remain at their bench, while the teacher moved from student to student. The students were not allowed to sand their piece until it had been examined and found sufficient by the teacher. After working, the students put away their tools and cleaned up the workspace.

Educational slöjd helped students develop in many ways. They learned hand eye coordination obviously but also accuracy, learning the importance of quality in workmanship and learning to understand and honor handwork and physical labor even if they were not going to work as artisans. Thousands of teachers from all over the world attended classes at Nääs. Some of the countries, in which slöjd was successfully introduced were the UK, the US, Japan, Brazil, Argentina, Cuba, the Scandinavian Countries and many more. Currently, slöjd is still part of the compulsory school curriculum in Finland, Sweden, Denmark, and Norway. In Sweden, students choose between wood and metal or textile sloyd, and in Denmark all three materials are compulsory as individual subjects; and in Norway they are united into one subject called forming.

Young boy at his workbench:

Sloyd School, Welland Plant, ca. 1915:
Source: http://playbuildmake.blogspot.com/2009/09/educational-sloyd-naas-sweden.html

Video about educational Sloyd (PBS, The Woodwrights Shop: Who wrote the book of Sloyd?):
http://video.pbs.org/video/1772022559

The Teachers Handbook of Slöjd by Otto Salomon:
http://www.archive.org/stream/teachersbookofsl00saloiala#page/n15/mode/2up

Tuesday, December 13, 2011

Rojana Ibarra:Wood Jewelry

Wood Jewelry has been around from the beginning of time and now has been getting a new look with the use of modern technology. Before people only had natural resources such as wood, bone, teeth, leather, and stones to create jewelry. While now we have much more tools and technologies to create these wearable natural works of art. Once thought as tribal and native, wood jewelry is now seen as more contemporary and chic. This semester in my intro to metalsmithing class we worked on creating mostly jewelry, this got me thinking and I thought what about wood jewelry and and combining the two. So I started to look up wood jewelry and fell in love with some of these creative designers.
Anthony Roussel creates beautifully intricate jewelry that are works of art. Roussel bonds thin layers of wood such as birch, sycamore, ash, maple and walnut and then uses the latest technology in designing his jewelry. He works with 3D software, CNC routing and milling machines, laser cutting and or etching, and water jet cutting methods. He uses digital software to create his designs then laser cuts them to seal the edges. He then finishes them using eco friendly milk based paint.
Bangle Bracelets
Rings
Gustav Reyes has very sleek and contemporary designs such as this necklace titled: Tie Me Not Neckpiece.
Reyes makes this necklace out of either 3-4 different types of woods: walnut, maple, cherry and/or rockelm. Each piece of this necklace is hand formed using a cold bend process, and finished with natural beeswax. The cold bend process is where a piece of wood is put in water before it is put into a mold and bended to the desired shape. He also is using salvaged wood in his pieces, which is inspiring and eco-friendly. He uses wood from old instruments such as bass violins and xylophones to other things like baseball bats. He re-purposes salvaged wood from one form and function and transforms it into a new shape and function.
Good Wood NYC is a company started in 2007 that uses techniques such as engraving, hand sanding, and painting to create fashionable jewelry and accessories out of wood.
In researching I also found out about many different techniques there are in creating wood jewelry from carving, lathing, and even mixing it with different materials such as precious metals and stones. The plus side is if using salvaged wood or remnant pieces you are being more ecofriendly and helping the environment. The possibilities of materials are endless and I hope to start experimenting myself on creating some of my own unique wearable works of art.

Sunday, December 11, 2011

milk paint

Okay,

for my next project I want to make part of an illuminated manuscript but really big and only a couple of letters, so I started looking at the illuminated manuscripts that have been around forever and noticed that along with all the beautiful gold was color that enhanced the gold, so I was trying to think of what kind of paint I would use for this glorified illuminated manuscript on wood. I want to use something that has some historical meaning as well as being very earth-based, natural, to really employ the richness I am looking for. Oh, also I need to have a good red and blue. I talked to a friend of mine the other day and he started talking about this stuff called milk paint. I did a little investigating into this stuff and as it turns out learned a bit about the history of paint as well as. Here is what I found out-

Milk paint has been around for thousands of years. It has been revealed that ancient artwork found on cave walls was applied using a form of milk paint. Artifacts including models of boats, people, and furniture found inside the burial chamber of Tutankhamen had been painted with milk paint. Supposedly the vibrancy of the milk paint color on these discovered pieces is quite remarkable. As well as for its decorative use the milk paint possesses protective properties that add to the durability of painted surfaces. It has been used for centuries to paint furniture, homes, barns, and artwork.

The "recipe" for milk paint is very environmentally -friendly; it is composed of natural ingredients- milk protein, lime, and earthen pigments. One of the drawbacks to the paint, though, is that the shelf life is not more than the length of time it takes for milk spoil, so one has to mix up a quantity that can be used up quickly. Milk paint paved the way for the creation of oil paints. By adding linseed oils, olive oils, animal glue and waxes, milk paint became very durable and could last indefinitely. Unfortunately other more toxic ingredients like lead and mercury were added as well. In 1868 the first patent was given for metal paint can with tightly fitting top and of course the commercial oil paint industry began. Then after WW ll chemists worked on developing new formulas for paints that were less toxic. In 1970 lead and mercury were no longer allowed as ingredients for commercial paint.

The Old Fashioned Milk Paint Company was established in 1974 and has been making milk paint with the original safe ingredients since then.

So there you have it, what I think I will use for the colored part of my illuminated manuscript on wood. I have never really delved into the history of paint and now I feel a little more knowledgeable and am ready to make some of my own to try for my project.

I did find a recipe, so now all of you can try this too:

Milk Paint Recipe
1 quart skim milk, at room temperature
1 ounce hydrated or slacked lime by weight. This is available at building centers. Do not use quick lime which is a component of concrete and mortar since it will react with the water in the milk and heat up. Hydrated lime has been soaked in water then dried.
1 to 2 1/2 pounds of chalk may also be added as filler. Finely ground natural chalk can be found in the section of home improvement centers where cement is sold or pool supply retailers in 3 or 10 lb. packages. If you omit the chalk you will basically have a stain, which works well, especially on unfinished wood.
Stir in enough skim milk to hydrated lime to make a cream. Add the remaining portion of skim milk. Now add sufficient amount of powder pigment to desired color and consistency. Pigment powder must be lime-proof. Stir in well for a few minutes before using. For best results continue to stir throughout use. Apply milk paint with a cheap natural bristle brush. Allow project to dry sufficiently before applying next coat at least 3 to 4 hours.
Once the paint is completely dry, you can add 2 coats of color free furniture wax to protect the finish.
note: you should use your milk paint within 3 0r 4 days since the milk will go sour. Refrigerate before and after use.

A Few Ancient Boat-Building Techniques

Aside from terrorists, everyone loves boats. It is no surprise, then, that they represent one of the oldest modes of transportation known to date. Excavated remains in the 7,000-10,000 year old range, along with circumstantial evidence associated with the settlement of Australia and Crete (40,000 and 130,000 years, respectively), suggest that we have been nautically inclined for a good portion of our history as a species. If aliens came to Earth any earlier than the Mesolithic period, and brought advanced vehicles with them, they cleaned up after themselves fairly well. Until such evidence becomes apparent, we shall have to stick with boats. Over the centuries there have been myriad types and construction methods, each adapted to unique needs and resources, though for this entry it seems best to focus on a few types that seem particularly relevant to my own work. I have a soft spot for ancient fabrication technologies, and this is something of a wood-oriented course, so newfangled composite materials and ultra-modern construction methods have no place here.


The oldest floating stock were most likely plain logs. Eventually our early ancestors seemed to realize that by making adjustments to the shape of a large piece of wood, they could achieve increased maneuverability, greater stability and ample space for themselves and their belongings. These dugout boats, known for their durability and ease of construction, have been used throughout history (continuing to this day in many parts of the world). Production is fairly simple. After acquiring a log or tree trunk of suitable dimensions, shipwrights cut the exteriors to shape with the tools at their disposal (stone and bone, followed later on by metal). Though the keeled, pointed bow and stern configuration is common, changes were often made to the design based on intended use (those navigating shallower, calmer waters often opted for flat-bottomed designs with an asymmetrical plan). Once the exterior was shaped to specification, the interior would generally be hollowed out by notching (cutting a series of parallel grooves across the span of the hull, then chipping out material between the notches until the desired depth and profile are achieved), or by a controlled fire (in which coals are placed onto the surface of the wood until sufficient material is removed, leaving burnt wood to be removed by an adze or similar tool). Once a rough shape was attained, the interior would generally be dressed out using smaller hand tools. Once smoothed and shaped, boats were ready to be used, though outfitting was often required based on use (sea-going vessels were often fitted with sails and/or outriggers for increased stability and efficient propulsion on longer voyages).


Where the available wood was of insufficient size for dugout construction, it became necessary to use other production methods. In parts of the world, framed boats with bark (in the Americas) or stretched hide (among the Inuit of the Arctic, Bering and North Atlantic regions) hulls became common. In the ancient Near East, however, planked construction (in which planks of wood are – often, though not exclusively - attached to a timber frame for shape and structure) set what would become the standard of shipbuilding for centuries to come. In 2000, an expedition uncovered what turned out to be the oldest known planked vessels at Abydos (Upper Egypt). A fleet of 14 ships were discovered in brick graves previously thought to be architectural walls. Though much of the hulls had deteriorated, their shape was luckily preserved by the excrement of wood-eating insects, who left behind a perfect copy of the structure in their wake. Analysis of the remains determined that planks were fastened together using mortise-and-tenon joints, then sealed with reed bundles (the remains of which were found at the site). A later variation on this method, using a free tenon instead of one left attached to a plank, became the standard in the Mediterranean (though the Egyptians were never known as much of a sea-faring people). Interestingly, these boats (associated with an early dynasty) seem to have been built from the outside in and without any internal framing, which accounts for the warping seen when taken out of the water. Based on their location and orientation (facing the Nile, and roughly a mile from a set of royal tombs), these boats are thought by archaeologists to have been meant for the Pharaoh's use in the afterlife, and stand out for their ritual significance as much as for their striking construction.


You might be wondering what work I might be imagining that involves ancient boat construction, particularly dugouts and Egyptian funerary vessels. I shall leave it to this: it involves a Coptic monk, a shark-man, the apocalypse and a coyote. This has been a good semester.


A log floating in some water; this is where all the trouble started.
Wherever
Whenever

The Pesse Canoe
Netherlands
8040-7510 BCE

The Great Canoe (Haida)
American Museum of Natural History
1883

Boat Grave 10
Abydos (Upper Egypt)
Second Dynasty (c. 2675 BCE)

Khufu Ship
Giza Pyramid Complex
c. 2500 BCE

References:


Adams, Jonathan. "Ships and Boats as Archaeological Source Material." World Archaeology 33,

3 (February, 2001): 292-310. Accessed December 11, 2011.

http://www.jstor.org.libaccess.sjlibrary.org/stable/827924


Vinson, Steve. "Ships in the Mediterranean." The Biblical Archaeologist 53, 1 (March, 1990):

13-18. Accessed December 11, 2011.

http://www.jstor.org.libaccess.sjlibrary.org/stable/124440


Waterbolk, H.T. "Archaeology in the Netherlands: Delta Archaeology." World Archaeology 13, 2

(October, 1981): 240-254. Accessed December 11, 2011.

http://www.jstor.org.libaccess.sjlibrary.org/stable/124440

Friday, December 9, 2011


Henrique Oliveira

So upon browsing laminate wood artI came across this interesting image. It looked like dirty water, but a closer look revealed wood. To add to it, the medium is a recycled material, found local to the city he is from, Sao Paulo, Brazil which to me is something I appreciate.

His installations occupy the entire room and almost seem as if the room itself is some creature or is being transformed. There isn’t much about his process, other than he laminates and bends the wooden pieces. But his work evokes movement, fire, destruction.


Using old plywood fences to convey this amazes me. Repetition through from and similar color is something I can appreciate. Like brushstrokes upon a canvas, he uses an entire space. Scale is definitely large, but I feel miniatures could just be cool as well.


I guess the point that I’m getting to, to relate to the blog is the Recycled Lumbar aspect. Obviously wood is not some thing that man can make over night and use. But finding and using wood that can be re-used for further building, art making, or whatever, is a plus. I don’t know how many more trees there are in the world, or if our consumption of wood greater than it is being grown (which my guess is) but to me a tree is a precious thing. I mean if there’s enough to go around then by all means. But I’m sure this resource is a limited one. And by making good use of the processed and reclaimed material is an awesome idea. Why not make sweet art?

Sunday, December 4, 2011

Julia Weber: Homemade Wood Stains

Homemade nontoxic wood stains offer a great alternative to store bought woods stains. Commercial woods stains often contain chemicals, that are not only problematic environmentally, but may also pose a health risk. A variety of methods can be used to create inexpensive, natural wood stains with ingredients that may even be found in the kitchen, such as black tea, vinegar or walnut hulls.

These naturals stains need between a few hours to a few weeks to soak before they are ready to be applied. Taking good notes while experimenting with homemade woods stains is essential for the possible re-creation of a specific stain. It is recommended to use a scale to record the exact measurements of the ingredients used, to write down the amount of time they were allowed to soak and to keep track of the number of coats applied.

A simple way to create a natural stain is to boil tea leaves in a cup of water to a deep tea concentrate. Tea contains tannins that impart a warm honey-colored tone onto light woods such as maple, pine or birch. It's subtle and easy to control by adding more coats. Different teas will give different shades. The tea tone can be further darkened by following an application with ammonia as ammonia reacts with the tannins.

Walnut hulls are known to create a beautiful dark stain that is darker than tea stains. The walnut hulls are be boiled in water and then soaked in jar for a couple of days until the water turns dark.

Tannins react with metal and can be actively darkened by the application of a metal-vinegar mixture. To make a dark gray or an ebony stain rusty nails are soaked in a jar of vinegar for about two weeks until the vinegar turns dark. Vinegar mixed with pennies will produce a pale blue stain.

For a brown stain chewing tobacco may be added to equal parts of water and ammonia and left to set overnight.

All materials need to be strained before the application. The homemade stain should be tested on a piece of scrap wood. It should be the same type of wood as the actual piece, as the stains can look different on different woods. The stain is rubbed onto the wood with a rag. If the results are satisfactory, the stain may be applied to the actual project. Each coat of stain will darken the wood, some may darken more as they dry. It is recommended to stop before it looks as dark as desired, because the finish will make the wood look even darker.

These homemade stains don´t have a binding agent, like the commercial stains. The stain still needs to be sealed using a finish like shellac, linseed- or tung-oil. It is best to wait a few days after the stain has dried to apply the finish.

Pennies soaked in vinegar


Test piece with different stains


Images by:
http://www.toolgirl.com/toolgirl/2010/03/staining-wood-with-cheap-natural-and-nontoxic-tea.html