Sunday, December 4, 2011

Julia Weber: Homemade Wood Stains

Homemade nontoxic wood stains offer a great alternative to store bought woods stains. Commercial woods stains often contain chemicals, that are not only problematic environmentally, but may also pose a health risk. A variety of methods can be used to create inexpensive, natural wood stains with ingredients that may even be found in the kitchen, such as black tea, vinegar or walnut hulls.

These naturals stains need between a few hours to a few weeks to soak before they are ready to be applied. Taking good notes while experimenting with homemade woods stains is essential for the possible re-creation of a specific stain. It is recommended to use a scale to record the exact measurements of the ingredients used, to write down the amount of time they were allowed to soak and to keep track of the number of coats applied.

A simple way to create a natural stain is to boil tea leaves in a cup of water to a deep tea concentrate. Tea contains tannins that impart a warm honey-colored tone onto light woods such as maple, pine or birch. It's subtle and easy to control by adding more coats. Different teas will give different shades. The tea tone can be further darkened by following an application with ammonia as ammonia reacts with the tannins.

Walnut hulls are known to create a beautiful dark stain that is darker than tea stains. The walnut hulls are be boiled in water and then soaked in jar for a couple of days until the water turns dark.

Tannins react with metal and can be actively darkened by the application of a metal-vinegar mixture. To make a dark gray or an ebony stain rusty nails are soaked in a jar of vinegar for about two weeks until the vinegar turns dark. Vinegar mixed with pennies will produce a pale blue stain.

For a brown stain chewing tobacco may be added to equal parts of water and ammonia and left to set overnight.

All materials need to be strained before the application. The homemade stain should be tested on a piece of scrap wood. It should be the same type of wood as the actual piece, as the stains can look different on different woods. The stain is rubbed onto the wood with a rag. If the results are satisfactory, the stain may be applied to the actual project. Each coat of stain will darken the wood, some may darken more as they dry. It is recommended to stop before it looks as dark as desired, because the finish will make the wood look even darker.

These homemade stains don´t have a binding agent, like the commercial stains. The stain still needs to be sealed using a finish like shellac, linseed- or tung-oil. It is best to wait a few days after the stain has dried to apply the finish.

Pennies soaked in vinegar


Test piece with different stains


Images by:
http://www.toolgirl.com/toolgirl/2010/03/staining-wood-with-cheap-natural-and-nontoxic-tea.html

Tuesday, November 29, 2011


Jonathan Huang

The End Grain Cutting Board

One of the most important tools for the home cook or Chef is the Chef's knife. Keeping a sharp knife is a matter of safety as much as it is a matter of efficiency. Plastic cutting boards are harder than wood cutting boards and will dull knives much faster than long grain or end grain wood. But is plastic more hygienic than wood?

For a long time plastic was considered more hygienic than wood, because it is nonporous and harder. The thinking went that since plastic was hard and non porous it would have fewer scratches from knives and harbor less bacterial growth. Plastics are used in hospitals and have a clean reputation. For years the Food and Drug Administration and the US Department of Agriculture made plastic cutting boards required in commercial kitchens of restaurants hospitals, anywhere and every where in the US that prepared food for public consumption. That all changed in 1994 though when Dean O. Cliver P.H.D. began his research at UC Davis, testing bacterial growth on wooden and plastic cutting boards comparatively. In his study which is neatly summarized here:
Cliver used wood and plastic cutting boards that were old and knife scarred, an looked for E Coli, and Samonella. He found that on wooden cutting boards bacteria applied was later irrecoverable, on plastic however bacteria persisted and in some cases multiplied. Wooden cutting boards also have the advantage of being able to be microwaved for short periods of time to disinfect them.
Since Cliver's research has been published his finding have been replicated in many other labs and have even become a popular high school science experiment. The USDA and the FDA now recommend hard wood cutting boards as well as plastic: http://www.fsis.usda.gov/PDF/cutting_boards_and_food_safety.pdf actually more important than the material of the board is the separation of cutting boards for separate cutting duties for chicken and beef and veggies.
Of wooden cutting boards end grain boards are the easiest on kitchen knives. This is because the edge of the blade actually cuts with the direction of the wood fibers as opposed to across the wood fibers. For the serious chef this means less time sharpening, honing, and stropping the kitchen knife and more time chopping, slicing, dicing, and julienning. End grain cutting boards also have a "self healing" feature that helps them wear better than long grain or plastic.
For a project for next semester I would like to make several end grain butcher block cutting boards out of Maple and African Mahogany. In my research for cutting board plans I came across this video http://thewoodwhisperer.com/butcher-block-cutting-board/ by Marc Spagnuolo. Watch this! You will be hooked! (He is a lot like Shannon, in that he can discuss at length a myriad technical wood working topics, he has videos on efficient sanding, detailing various paper types and pad densities for the ROS. He has a video on chisel sharpening, and even has a video about nasal irrigation to wash out sawdust particles! I have been doing this for years and have found it very beneficial as a ceramic artist to flush the nasal passages of ceramicy micro boogies.)

Anyways, in Marc's video he details more than just dimensions and procedures but has many useful tips that like using an ink brayer to spread wood glue, turning the wood pieces at 90 degrees to make glue up speedy and efficient, and wrapping wooden "calls" in clear packing tape to deter glue from sticking to them. Marc explains that titebond 2 is a food safe, as well as salad bowl varnish which he likes to finish the cutting board with.
Before I make my first end grain cutting board I will do a little more research on various finishes and wood toxicity levels. Coming from a family of epicureans I know end grain cutting boards will be an appreciated and well used gift.

Thursday, October 27, 2011

bow-making and the anatomy of wood

I have been wanting to make my own bow and arrows for a few years now, but time seems to be lapsing at a much faster pace than I can keep up, so I have been doing no more than a bit of research now and again on this subject. A book called, "The Traditional Bower's Bible" that I own has just a plethora of info on anything you'd want to know about the components of what goes into making a sound bow and arrows, but I am first interested in finding the right wood and am still not exactly sure of how to pick it out and where on the tree exactly to take it from.

Anyhoosenheimer, I thought I would just share a bit of the info on the anatomy of wood that the author's describe in this book. I learned that there is so much more to the intricacies of a tree than I had ever imagined, and it is these intricacies that make or "break" a bow.

All trees can be used for successful bows, but it is important to know where in the tree to retrieve the wood. Interesting, it is, and overwhelming at the same time.

Here you go with a much condensed version of what I read.

First of all there are many factors about wood that are used to decide which part will work for a bow. Looking at the anatomy of the wood, the annual rings, the grain, the age and density,the reaction, tension and compression wood, branch wood, decay, etc. one can pick out a wood suitable for a nice strong bow.

Wood is formed only by a thin layer of living cells between bark and wood, called the cambium. The cell wall is long-chain molecules of cellulose that provides tension strength, lignin compression strength. As the tree grows, the inner portions of the trunk are no longer needed to bring water and nutrients to the leaves and this inner portion is transformed into heartwood. Sapwood becomes heartwood as the tree creates and deposits chemical and mineral extractives in the cells. This is interesting: sapwood is not resistant to fungi, but heartwood is toxic to fungi.

Sapwood can be compression-weak compared to the heartwood, yet one year later when extractives have been infused into the inner sapwood ring, that sapwood, now heartwood is a different creature. Every heartwood serves well in both tension and compression meaning it is good for bows.

Heartwood as well as sapwood is dead wood, and unless discolored by decay or compromised by insects, weathering or physical trauma it's as sound as if new. So in theory any old wood can be fine for bow-making, whether from the inside of a tree, basement storage pile or old doors or flooring. Good to know.

And here's something interesting that I didn't know - Hardwood is called porous wood. Who would've thunk. It's called this because conduction and support are performed by large-diameter, thin-walled cells called pores. Softwood is called non-porous wood. When the pores are concentrated in the early wood like oak, pecan, elm, Osage and ash they are said to be ring-porous woods. If they have evenly distributed pores like cherry, maple, and birch they are called diffuse-porous woods. Semi ring-porous woods like black walnut and persimmon have pores that are larger in the early wood, and become smaller toward the latewood with no distance transition. I know, I know-TOO MUCH INFORMATION, but you have to admit it is interesting and you didn't know it already. OH, maybe you all did, and I am just way too slow for you guys.

Here's something about the annual rings. If ring-porous hardwood rings are thin (many rings per inch) it will be light and weak and not usable for normal-weight bows. Unnaturally wide rings may also be less dense and weaker. But unlike hardwoods, the more rings per inch in conifers the denser the wood. It states in the book that if unhappy with a tree's surface ring structure one should explore deeper, where the wood may be thicker-ringed and denser.

Okay now a word about reaction wood- tension wood, compressions wood. For trunks to straighten themselves once moved from vertical, or to prevent branches bending down from their own weight, hardwood trees lay down tension-strong, cellulose-rich tension wood on the top side of trunks and branches. Conifers lay down denser and thick-ringed, higher lignin content compression wood on the bottom side. Wood with high lignin content is especially strong in compression. Most conifer species produce inadequate bow wood, but the bottom, compression side of horizontal branches can be sinew-backed, yielding first-class results. Compression wood shrinks or expands with moisture content (MC) changes 10 times or more than normal wood. Tension wood contains more cellulose than normal wood, so is especially strong in tension. The tension-wood side of a split stave will often dry into reflex. Hardwood reaction wood rings are not always eccentric as in conifers, so it's important to make the upper side before felling. If the top of such staves are not centered at bow back much twisting and warping will occur.

Anyhoosenheimer, that's a bit about the anatomy of trees from "bow-making eyes", but honestly, I am still confused. If anyone knows of an expert on bow-making let me know. I'd love to actually see all these things that are written, so it makes more sense. From the sounds of it I should be able to make a bow from the old back-porch door I've been storing for a million years. If that works I'll move onto some fabulous arrows with obsidian tips.

Nathan Cox - Northwest Coast Wood-Carving

My earliest exposure to art of the Northwest Coast peoples, or at least the earliest that I remember, came from the Field Museum in Chicago. The collection was tucked away on the main floor, somewhere behind a room full of faceless mannequins dressed in traditional attire from the Great Plains nations. At the back of this room, taking up the entire wall, was a life-size replica of a Pawnee earth lodge. As I remember it, the door into the Northwest Coast/Arctic room was sort of hidden around the back of this lodge (that could have been a decision meant to ease the transition between the two distinct geographical regions, but just as likely the curatorial team had an awkward time finding a good space for that big ass lodge and that was their weird solution*). Whatever the reason, stepping through that doorway always felt like one of those down the rabbit hole experiences to me. And cut to . . .


The gallery was a completely different kind of space. I was large, dark and silent. It still seems a little spooky, even now. I did spend the night in there once, though. It was worth it for that collection. There was the standard artifacts (dogsleds, whaling/hunting paraphernalia, giant crabs, etc.), but what always stuck in my memory was the collection of wood carvings. There is a very distinctive aesthetic associated with Northwest Coast art that makes it instantly recognizable. Wood is the traditional material for most carvings, though the Haida have a long tradition of working in Argillite and many contemporary artists have recently taken up bronze. Whatever the medium, methods are almost universally traditional: artists work their materials using hand tools (axes, chisels, adzes, etc.) and large pieces are erected manually by members of the community. Though the concept and design details often vary based on the needs of the community, themes drawn from mythological, religious, cultural and historical (both societal and familial) sources are especially popular. Figures walk a blurred line between representation and abstraction, with forms that are identifiable as both organic and geometric (or, just as easily, as neither). Deeply-carved lines are complemented by a sparse palette (rarely more than 3-4 colors, if any), enhancing the effects of light and shadow on the piece's surface. Though worked almost entirely by hand, experienced carvers are able to produce a remarkable level of consistency in their treatment of the material, producing near-perfect symmetry and balance. As most objects are worked down from a single mass, joinery is typically minimal (aside from the occasional outstretched wing of a bird, or basic bindings for an articulated mask) and each piece retains strong references to its natural structure.


This faithfulness is not limited to aesthetics, but finds expression in the social life of a piece. As mentioned above, the construction and erection of a totem pole is rarely an isolated act. While the actual production is typically carried out by a single artist or a small group, the commission comes on behalf of the entire community, which takes part in the installation and dedication. Furthermore, once erected, poles are rarely maintained. Instead, in reference to their origins, they are left to the elements until they fall of their own accord (or, in some cases, they are deemed hazardous and removed). This lends to the carvings a sense of placement and fragility not immediately evident from the appearance alone, which allows them to become something more than a narrative or a commemoration. That seems to be the attraction for me. I come for the craft, but I stay for the perspective.


*Now that I think on it, the lodge shared a wall with the Northwest Coast gallery. There was a diorama of a wolf den and some Inuit dwellings on the opposite side. It all makes sense now.


Norman Tait (Nisga'a), Totem: Big Beaver (1982)


Freda Diesing (Haida), Raven Rattle (date unknown)


Robert Davidson (Haida), Eagle Transforming Into Eagle (2002)


Bill Reid (Haida), Raven and the First Men (1980)

Sources:

http://www.nfb.ca/film/bill_reid (A short documentary from the Canadian National Film Board, featuring Bill Reid's construction of a totem pole for the town of Skidegate, BC)

http://www.biographi.ca/009004-119.01-e.php?&id_nbr=7354 (A short biography of Charles Edenshaw, a key figure in the 19th century revival of Haida art)

http://www.royalbcmuseum.bc.ca/MainSite/ (The Royal British Columbia Museum - they have a large collection of Northwest Coast art, although their online catalog is under construction)

http://www.nfb.ca/film/totem_the_return_of_the_gpsgolox_pole/ (Another Canadian National Film Board documentary, dealing with issues of ownership in indigenous art)

http://www.spiritwrestler.com (A Vancouver gallery specializing in contemporary Inuit, Northwest Coast and Maori art)

Wednesday, October 26, 2011

Japanese Woodwork

Japanese woodwork is well known for its strive for perfection, advanced joinery, and its planed wood surfaces. Japanese woodworkers generally work with soft wood instead of the commonly used hardwood. Japanese woodwork has 4 distinct categories that each have their own unique specialty. Miyadaiku is a type of Japanese woodwork that focuses on the construction of shrines and temples. These temples and shrine are built using advanced joinery like the butterfly joints, and the temples and shrines built seem to be the longest surviving wood structures in the world. Sukiya daiku focuses on teahouses and residential buildings like houses. These type of woodworkers are well known for aesthetic reasons as well as the use of rustic materials. Sashimonoshi is the term used for woodwork that focuses on furniture. An example of this type of woodwork would be pieces done by George Nakashima. Tateguya is Japanese woodwork that is used for interior finishing. These 4 main types of woodwork in Japan all require tools that are specifically used for Japanese woodwork.
4 main Japanese woodwork tools that differ from the standard Western tools are the Japanese saw, plane, and gimlet. The Japanese saw is differs in that instead of using a push stroke to cut, it uses a pull stroke and the saw blades are considered much thinner compared to the Western blades. There are two main types of cutting teeth on Japanese saws which is the yoko-noko-giri (rip) and the tate-noko-giri (cross cut). Combing these two teeth make the ryoba, which is the dual edge blade. Dozuki is a blade used by Japanese woodworkers to cut fine joinery like butterfly joints, and the Azebiki is used to saw in confined areas or start cuts in the middle of wood pieces.
The Japanese plane is another tool that differs from the Western tools. The Japanese plane commonly consists of a wooden block containing a laminated blade, sub blade, and securing pin. The support bed for the blade is convex instead of being flat like the western blades. Again this tool differs from the Western version because to operate it you pull instead of pushing. The yarigawa is the old fashioned Japanese plane that resembles a spear. This plane is used for large circular columns or where an unsophisticated look is desired.
The Japanese have a wider variety of chisels than Western woodwork. Some chisels are the bench, paring, striking, heavy timber, and slicks. Each chisel has their own unique function and are used for different type of wood pieces. Some chisels are used for removing large while others are used to make sharper angles in the timber. The Japanese gimlet is a tool used to make a mortise by drilling circular holes in the wood. This tool is one of the most difficult to master in Japanese woodwork. Japanese also have a wide variety of hammers that are used in woodwork. There are 18 different types of hammers used, each with their own unique specialty. The Japanese tend to have a wide variety of tools each with a specific design, for example the chisel and the hammer.
The Japanese differ from the western woodwork through their various tools and techniques. Joints also tend to differ because the Japanese use an advanced type of joinery when it comes to building buildings and furniture. The Japanese display patience and strive for perfection when it comes to woodwork. They also are well known for their unique designs and creativity. The wood pieces are not only creative but also well made and built wood structures that are known to be the worlds longest surviving structures.

Tuesday, October 25, 2011

Jonathan Huang


Nick Schade The Hatori Hanzo of Kyak makers!


I stumbled upon Nick Schades work while researching what other artists and craftsmen are were making out Cedar (Cedar is the primary material of Ursula Von Rydingsvard). Nick Schade a former Navy engineer, made his first Kayak in 1986 out of the belief that he could make a sea worthy, responsive, light and durable kayak from the strip built method.
The strip built method (which previously had been used to craft canoes but rarely if ever kayaks) is a process of laying down and gluing dozens of western red cedar strips on to a form. The strips generally run the entire length of the kayak which may be as long as 20 feet. The form itself is around 20 MDF cross-sections of the hull of the kayak (cut out on the band saw) attached to an aluminum strong back held up by saw horses. Once the strips are glued together, the long process or plaining and sanding begins. A light stain is then applied to the wood to bring out wood grain and color. After this dries a fiberglass fabric is placed on the kayak covering the entire hull. Epoxy is brushed onto the fabric making the fabric transparent and exposing the rich color and grain of the cedar beneath it. The fiber glass servers to strengthen and to water proof the vessel. A similar process is repeated on the inside of the craft with a carbon fiber and kevlar woven fabric.
Nick Schade has become well renown not only for his kayaks but also his willingness to share designs and strip building processes. He has published two books on strip built kayaks and will also custom build a kayak through his business http://www.guillemot-kayaks.com/guillemot/. Schade kayaks have been written about in national publications and are shown in the American Craft Museum as well as the Museum of Modern art in New York.
While the prospect of making my own kayak is equal parts exciting and daunting, the process of strip built wooden sculpture is very interesting. Strip building would allow for sculptures with complex curves to be light weight and even buoyant. One could craft strip built wooden balloons fill them with helium and tie them down to uprooted stump. What if Jeff Koons giant silver balloon dog was strip built western red cedar? Perhaps the greatest advantage of strip building is not the complex curves (as these can be achieved through carving) rather it is the light weight durability of the finished work. This would portend well for any works that may involve buoyancy or a dramatic contrast of scale and density.
Another artist that employs strip building in some of his works is Martin Puryear. Durring his youth Puryear actually learned to build guitars, furniture, and canoes! Most likely he employed the strip built method around a form for the canoes. In Puryear's pieace "Brunhilde" which I had the pleasure of seeing in person at SFMOMA a few years ago) Puryear utilizes a open strip built basket weave method to create a form that is like that of an expanded basket. This piece I was imediatly drawn to for it's large scale, volume, and negative space. "Bird Martin" by contrast also uses the strip built method. Rather than lining up each strip and glueing the edges together, Puryear hi-lights the process of making the form by over-lapping each strip in a random patternless binding. This simultaneously connotes the random weaving of a birds nest and also an emotive connotation of entrapment or imprisonment.
Strip building, like wood joinery, is another tool I am interested in adding to my sculptural tool belt. It is not technique that I would use exclusively, rather a method I would use when light durable organic curves are called for.

Sunday, October 2, 2011

Martin Puryear


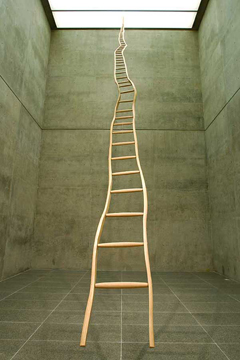
Martin Puryear, Ladder For Booker T. Washington (1996)
(Source: blog.art21.com)

Martin Puryear is an American sculptor working primarily in wood. While many other artists of his generation explored the aesthetics of industrial processes and materials, Puryear looked back to old techniques and placed and emphasis on craft and the handmade.  Although his pieces used the same formal vocabulary of minimalism and post-minimalism, communicating ideas through material and basic elements of form such as interior and exterior, he also placed an emphasis on the metaphorical potential of technique.  As curator Elizabeth Reede, “His basic vocabulary is made up of forms derived from everyday objects, both natural and manmade, from Africa, Scandinavia, Lapland, Japan, and elsewhere, including tools, vessels, and furniture as well as from domestic and public architecture and landscape” (Reede).  In this way, in addition to the materials and forms he employs, the many construction techniques he borrows from various crafts allow him to convey meaning and reference cultures and their histories.

Unlike other artists of his generation who used industrial processes, materials and workers to realize their visions, Puryear often relies on his own hands or those of skilled craftsmen.  Puryear’s interest in building things originated when as a child, "he studied crafts and learned how to build guitars, furniture, and canoes through practical training and instruction" (Art:21).  He has developed this interest further as his, "passion for diverse cultures and histories has led him to travel, study, and work in Africa, Asia, Europe, and the United States.  These explorations have permitted him to observe the material cultures of many societies around the globe, as well as the skills and trades employed there, and to make connections among disparate cultural traditions. (SFMOMA) Such techniques often come from furniture making, wood carving, “basket weaving, canoe building, the construction of tents, yurts and kites" hughes.  He often cites the time he spent working with, “African carpenters in a remote village in Sierra Leone as part of a Peace Corps program, and an important part of his aesthetic education came in 1966, studying with one of the great American furniture makers, James Krenov" (Hughes 78).

In one of his best known pieces, Ladder for Booker T. Washington, Puryear created a ladder with forced perspective which is 36 feet long. Although the piece has become about Booker T. Washington, “The joining of that idea of Booker T. Washington and his notion of progress and the form of that piece—that came after the fact” (Art:21).  Instead, when Puryear created the piece he was simply interested in combining the metaphors of forced perspective and saplings in order to make an open statement about time.  As Puryear says, “The work was really about using the sapling, using the tree.  And making a work that had a kind of artificial perspective, a forced perspective, an exaggerated perspective that made it appear to recede into space faster than in fact it does” (Art:21). Because of the process he employs to create the work, Puryear further locates that understanding within a specific culture; in his own words, “It's made like country ladders you see in places. People would cut a tree trunk in half and put rungs between the two halves.  And that’s a ladder” (Art:21).

Much of Puryear’s earlier work is less representational.  For example, The Charm of Subsistence (1989) consists of an abstract form that employs techniques of rattan basket weaving.

(Source: Healthcarefineart.com)

(Source: wickerworks.com.au)

Brunhilde also evokes techniques from basketweaving while its more open form evokes the frame of a yurt.


(Source: yurtworks.co.uk)


(Source: SFMOMA.org)

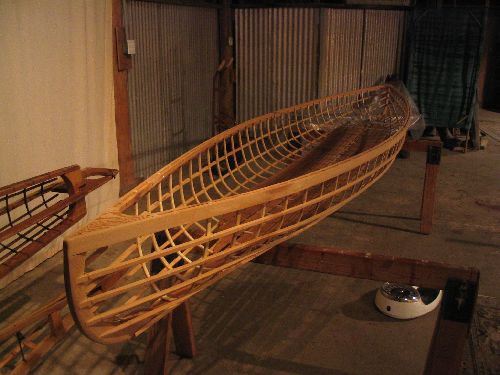
Bower (1980) consists of an open form which is constructed using techniques from canoe-making.


(Source: Capefalconkayak.com)


(Source: moma.org)

Finally, Vessel (1997-2002) consists of a complex pine frame that employs sturdier techniques from boatbuilding.
(Source: artinfo.com)


(Source: museum.gov.ns.ca) 


Works Cited:
"Art21: Martin Puryear." PBS: Public Broadcasting Service. Web. 02 Oct. 2011. <http://www.pbs.org/art21/artists/puryear/index.html>.
Hughes, Robert. "Martin Puryear." Time, 158.1 (2001): 78.
Reede, Elizabeth, John Elderfield, and Martin Puryear. Martin Puryear. New York: Museum of Modern Art, 2007.
“SFMOMA Presents A Retrospective On Sculptor Martin Puryear First Major Survey In 15 Years." San Francisco Museum of Modern Art. Web. 02 Oct. 2011. <http://www.sfmoma.org/about/press/press_exhibitions/releases/366>.